

KUMA: How to import assets exported from KSC CC to KUMA using API

Entry posted by Egor Erastov in How-to
331 views
Description
When we use Kaspersky Security Center Cloud Console (KSC CC), we cannot directly integrate KUMA with the KSC Server for collecting the asset information.
In this article, we will look at the steps to import assets from KSC CC.
Steps – plan
-
Assets/Devices to be exported from the KSC CC.
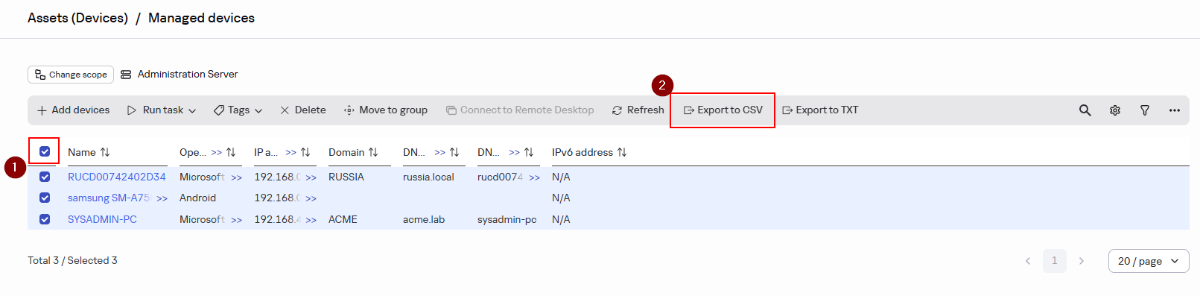
Before exporting the data, make sure to select the columns: Name, IP Address, Domain, DNS domain, DNS name, IPV6 Address, and Operating System.
- Create an API token with the required access rights from KUMA Web interface.
-
Modify the attached script with the IP address, API port, tenant ID, and API token.
-
Copy files to the KUMA server and execute the script.
-
Verify the assets in the KUMA WebUI.
Steps - detailed
1. Exporting the Assets from the KSC CC
- Login to your account at KSC CC and open your workspace.
- Navigate to Assets (Devices) → Managed Devices.
-
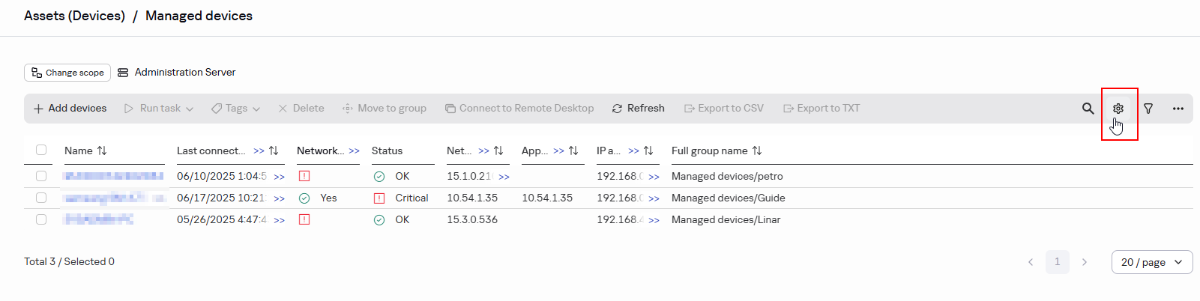
Press on a gear icon to open a list of the displayed columns:

-
Press Select all or select these columns:
- Name;
- Operating System;
- IP address;
- Domain;
- DNS domain;
- DNS name;
- IPV6 address.
-
Select all devices and click Export to CSV.
-
Copy the downloaded
CSVfile to the KUMA server. Rename the file, if required.
2. Creating an API token from KUMA WebUI
- Login to your KUMA Core server.
- Navigate to Settings → Users. In the right part of the Settings section, Users will be displayed.
- Select the relevant user and click the API access rights button in the details area that opens on the right.
- Select/Clear the check box for the required operation. Alternatively, you can select all operations.
- Click on Generate token button in details area. A New token window opens.
- If necessary, set the token expiration date or select the No expiration date check box.
- Click Generate token, copy the generated token and save in a file. If you did not copy the token before closing the window, you will have to generate a new token.
- Click Save.
3. Getting information about Tenant ID
- Login to your KUMA Core server.
- Navigate to Settings → Tenants.
- Click on Export with All fields.
-
Open the exported file named
tenants.csvand take a note of the value for Main tenant.
4. Modifying the script
1. Download the attached file: assets_import.py
2. Modify these lines:
FILE_PATH = Put the path of the file CSV file from the KUMA server.
TOKEN = Token generated from above section (Create API Token from KUMA WebUI).
ADDRESS = IP Address/Hostname of the KUMA server.
PORT = 7223, This is the API port in Standalone KUMA.
TENANT_ID = Tenant ID exported from the Main Tenant.
Don't remove the single quotes ' from the line items, your values of parameters should be within single quotes 'value'
5. Copying files to KUMA and execute the script
-
Connect to your KUMA server using
WinSCP -
Copy the script
assets_import.pyandexport.csvto any directory. -
From SSH session of KUMA server, navigate to directory with the files and provide execute permissions to the
assets_import.pychmod +x assets_import.py -
Execute the script on the KUMA server with the below command.
sudo python3 assets_import.py -
Verify the results of the command execution. Here is what the successful results look like:

6. Verify the Assets in the KUMA WebUI
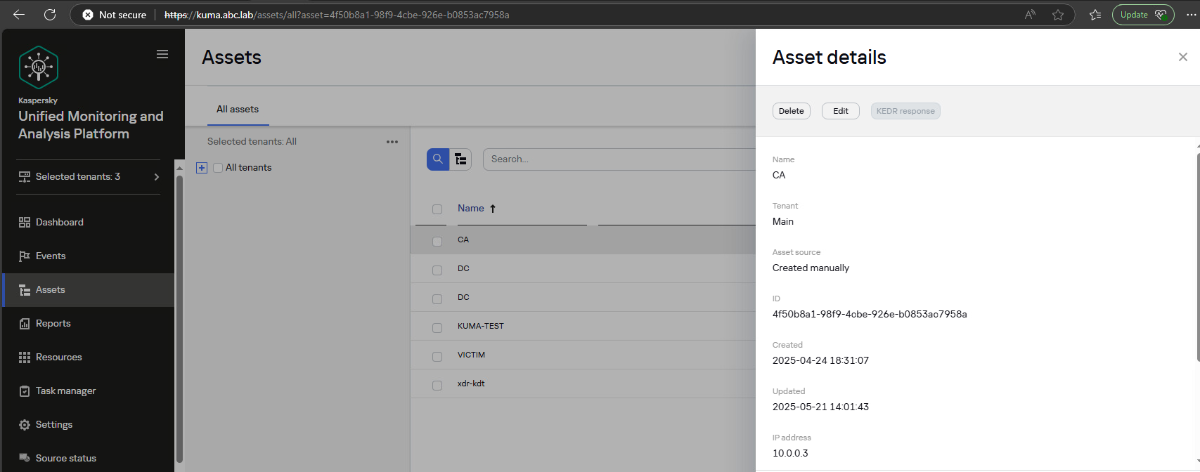
- Login to your KUMA Core server.
- Navigate to Assets → All Tenants.
- Click on an Asset and check the details. For example, Asset source: Created manually.
Sample Screenshot for the Assets
Additional notes for Assets
- Create categories based on the site name, if the assets need to be grouped by sites in KUMA. Additional criteria can be configured in the condition to move the endpoints based on a hostname/IP address to assign the category;
- Export the assets group-wise from KSC CC, and then use dedicated scripts to manually assign the endpoints to a category;
- Rename the files with group name before copying to KUMA server so you can identify them easily;
- Follow the steps, suggested in this article, to import the assets weekly/monthly basis. New assets will be added to KUMA and existing assets will remain as it is. The assigned category for the existing assets will not be impacted as well.


0 Comments
Recommended Comments
There are no comments to display.
Please sign in to comment
You will be able to leave a comment after signing in
Sign In Now